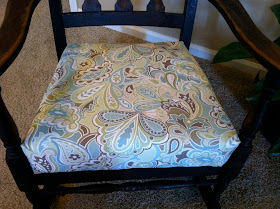
My parents recently brought me this rocking chair. It is a family heirloom. It belonged to my great great aunt who received it as a wedding gift more than 100 years ago. 100 years ago! Crazy! It is perfect for my front sitting room, so I was so happy they wanted to give it to me!
While the wood is in pretty good condition, the seat was looking rather rough. It had a layer of chenille-type fabric, that was covering a layer of this plastic-y vinyl stuff that was covering the original black leather. Nice. Not nice, it was filthy dirty. And that vinyl was SO ugly!!
The original leather was actually in pretty nice condition considering its age. Especially where it was underneath and hidden by the chair. Look at the difference! I just think this kind of thing is so cool.
Touching it, I just think of the ancient rears that had sat on that material. People I am related to down the line. I wonder if they could even fathom me or the future ahead. I try to think about my great greats down the line and what the future will be like, and I just can't seem to wrap my mind around it.
Look at the under side. The springs and everything have been tied together!
It has been signed in a few places too. To me it looks like it says, "blue". I don't know what this means, is this the person who made it? Does it mean anything at all? These are the things I wish I could know!
Once we took off the top two layers, I decided I want to keep the original leather. It isn't in horrible condition, and plus, I think that's part of what makes the piece so unique. I didn't want to lose that.
To protect it a little more, and to make it more cushion-y (is that a word?) I added a layer of batting. I stapled it around the sides with my staple gun. Then, I cut out extra fabric on the corners so it wouldn't be too fat, folded it like a present, then stapled the corners. (I did have more pictures of this process, except my finger was in most of them. good grief.)
Then I repeated the same thing with my fabric! Put the right side facing down on the table, with your cushion on top. Staple each side a couple times, smoothing out the fabric all around before you staple each time.
When doing the corners, fold in the side of the fabric first, then hold that down while you pull the fabric in front of you up, covering the piece you just folded in. I really just follow the same way I wrap a present. I just make sure all my edges are smooth, and sometimes I have to re-adjust to get it looking smoother.
I forgot to take a picture of it, but I used some of the same fabric I had leftover to cover the springs on the bottom. Even though you would never see the underside, I wanted to cover it up so the inside didn't get dusty and dirty over time.
I LOVE the way it turned out. I am so pleased. The fabric is so pretty, and the brown tones in it look so nice with the dark wood.
What I love the most is that I was able to bring new life back into this old chair. It's amazing what a little new fabric can do. As I sit in it now, I can imagine what life was like for my great great aunt, and dream about my great greats rocking in it one day too.
I'm linking up HERE


Beautiful! I love it! I have my great-grandparents' old rocking chair, and like you, I wonder about the people who have sat in it over the years.
ReplyDeleteYou did a great job! I love that you didn't paint the wood.
Janelle
homemadethisandthat.blogspot.com
Thank you so much Janelle!
ReplyDeleteYou did a great job! And it looks great even though the wood is unpainted! I love the fabric choice too!
ReplyDeleteLove the fabric choice!
ReplyDeleteLooks GREAT! I would love for you to share this at our link party. Also, thanks for linking up to Sunday Social.
ReplyDeletenew follower,
Kim
www.thesasselife.com
Great job. Glad I'm not the only one who ponders all the people and history my thrifty things have seen. Wish they all came with stories as good as yours.
ReplyDeleteThis would be a great project to add to my new link party, Thrifty Thursdays. Here's the link:
http://quiltedcupcake.blogspot.com/2011/10/thrifty-thursday-3.html
Thank you SO much for everyone's kind comments, I appreciate it!
ReplyDeleteCheck out these great blogs where I just linked too!
www.thesasselife.com
http://quiltedcupcake.blogspot.com
I'm also checking out
homemadethisandthat.blogspot.com
Love it! Such pretty fabric you picked too.
ReplyDeleteThanks Theresa! I'm glad I came across it, classic, yet modern :)
ReplyDeleteI absolutely love this, amazing job!
ReplyDeleteSarah
www.budgetfriendlydecorating.com
Wow, that is gorgeous! I love thinking about all the people who must have used the things that we have been handed down. I love how the pattern you used looks with the wood!
ReplyDeleteBTW-I'm following and subscribing back from Feed Me Friday. Oh So Savvy Mom
Oh so nice! Love the way it turned out too!
ReplyDeleteThanks again for partying with us at Show & Share!
And I'm featuring it in tomorrow's Show & Share! Hope you'll come grab a button!
ReplyDeleteWhat a wonderful re-do for a precious family piece...kudos to you!
ReplyDeleteDeborah.
PS Perhaps you might consider turning off word verification...bust blurfers may be more inclined to leave comments...just a thought...:)
Very pretty. Well done. Love the fabric with the wood, just like you.
ReplyDeleteluv luv the fabric.
ReplyDeleteWould luv for my readers to discover your blog, will you please join our weekly party at
http://www.passionatelyartistic.com/2011/11/thanksgiving-showcase-tutorial-with.html
have a great crafting week!
Maggie
http://passionatelyartistic.com