
This is the first fall that we've lived in our new house, so when it came to decorating for fall, I had a lot more space than the small amount of decorations I have could fill. Since we are still putting money into projects around here to make this house our "own" (this might be a lifetime process, I'll be honest) I was looking for ways to add a little fall time flavor on the cheap...or in this case free.
I remembered some boxes we have in the garage. They probably weigh a good...oh I don't know 50 pounds or more. And they are filled with nothing but candles...left over from our wedding...6+ years ago. But here's the thing! I'm not going to be ashamed of my pack-rat-ed-ness when the stuff is useful down the road. And this is one of those roads!

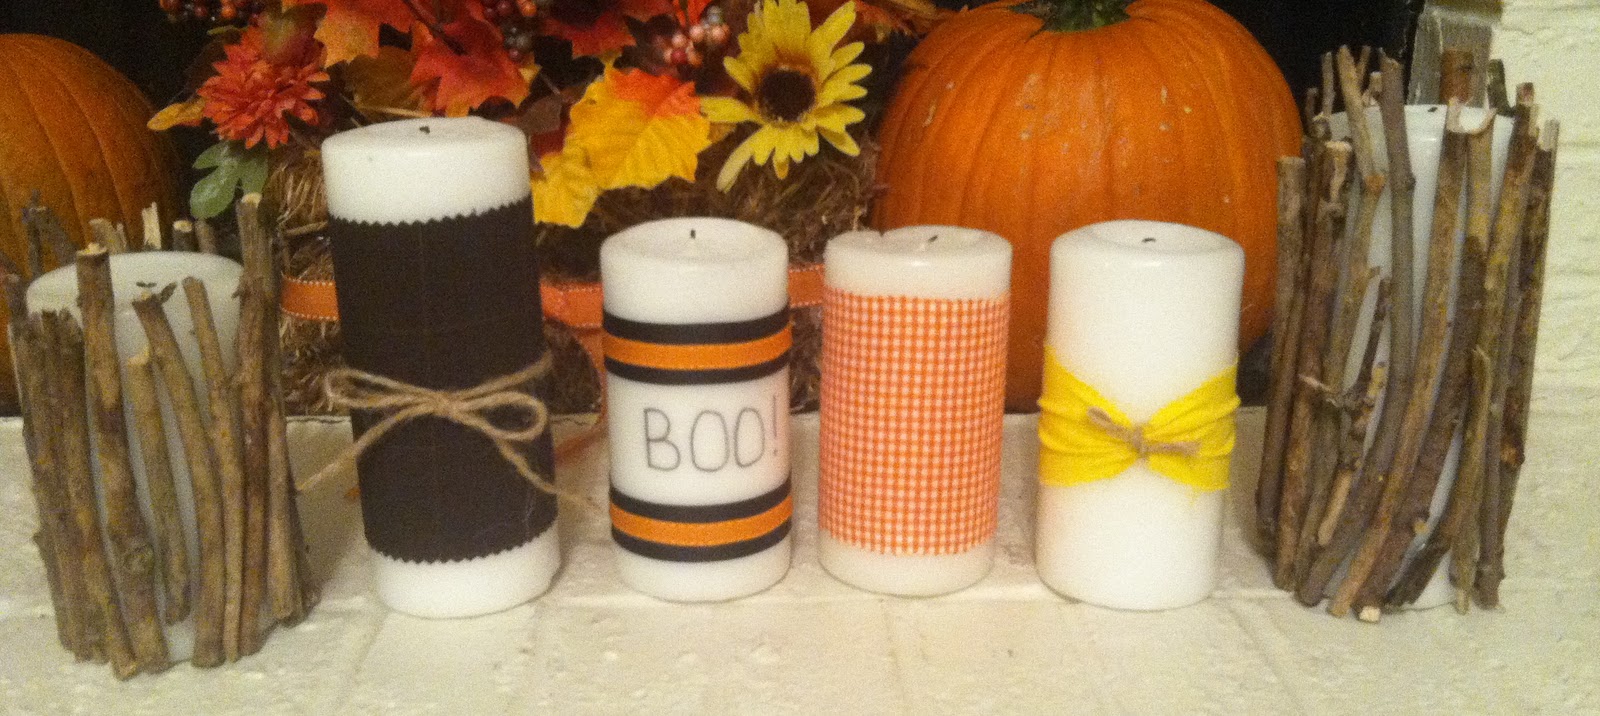
With the yellow candle, I had some of these left over yellow scraps of fabric sitting around the craft room
(I save almost all my scraps too, for reasons like this. Surely I'm not the only one. Anyone?) I hot glued it around the candle too. Then I took a really small piece of my jute and slid it under the fabric, then tied it in a knot. I like the gathered look to it. So cute, and so simple!
** Side note, next time, I would do this a bit differently. I would suggest tying the jute string around the fabric and THEN hot glue it on. It was a bit difficult to slide the string under the fabric...but totally do-able.

I saved my favorite for last. I was inspired by these on Pinterest, but my cheapness overcame me. I looked a few times for cinnamon sticks that aren't meant for cooking (those are real small), but I couldn't find any. Mind you, I looked in ALL the stores in my town that might have something like that- Kroger & Walmart. So, I decided to take a different route & kill two birds with one stone.
I have this giant tree that sits in my backyard. It's the tallest tree in our neighborhood. It also has some dead brancehs in it, so we are constantly finding sticks all over the ground in our backyard. I went out there & picked a bunch, and brought them in. (I hope my neighbors didn't see me, they probably think I am so weird. Well I am, but that's beside the point) I thought about washing them first (cause you know, they're dirty & gross) but I decided that was too OCD of me, and I resisted the temptation and went "au natural". Haha, I'm a dork.

Here are a few tips from what I learned. Hold the stick onto the candle before you glue it. Due to the varying bends and bumps of the stick, not every part will touch the candle. So to save yourself a little glue, hold it up how you like it, then peek and see where it will touch.

Hey...only trying to save you .003 cents on the glue you'll save! :)
Also, save some of those little pieces that break off accidentally, you can fill in some of the blank spaces. I like how some of the white peeks through, but in a few places it was a bit much. Stick scraps to the rescue! (This post should have just been titled "scraps & leftovers--crap that can be turned into something great!" hahaha)


I'll be partying here this week!
Until next time!


I love the boo one! haha
ReplyDeleteAww, thanks! It's one of my favorite too :)
ReplyDeleteSo cute! Love the ones with the sticks. I want try this! I am a new follower:)
ReplyDeletewww.karismaheartsavannah.blogspot.com
That is so cool - need to spruce up my candles now :)
ReplyDeleteLove for you to link up at:
"Made by ME" Linky Party at JAQS at http://www.jaqsstudio.com/2011/10/made-by-me-4-linky-party-and-features.html
Love the twine and fabric!
ReplyDeleteThese candles look SO great!
ReplyDeleteI'm hosting a Fabulous Fall party over at Not So Simple Housewife and I'd love for you to link this up! We are celebrating Fall and giving me and everybody else some great inspiration. We are looking for crafts, decor, food, and more! I'd love for you to add this and any other fall posts you may have!
Kaitlin-The Not So SImple Housewife
http://notsosimplehousewife.blogspot.com/2011/10/fabulous-fall-link-party.html
Thank you ALL for the kind comments! You are so sweet and I appreciate you!
ReplyDeleteI've linked up at these AMAZING blogs! Check them out:
www.karismaheartsavannah.blogspot.com
http://www.jaqsstudio.com
http://diycraftstomake.blogspot.com
http://notsosimplehousewife.blogspot.com
I absolutely love what you did with the candles. So creative!
ReplyDeleteSarah
www.budgetfriendlydecorating.com
They are all awesome!!
ReplyDeleteThanks for sharing at Show & Share!
Love these! Especially the stick ones. They just look so rustic. Like they should be in a mountain cabin with a fire roaring in the fire place. I'm a new follower and I've given you an award over at my blog, Between the Rafters. Please stop by and visit the other award winners. Perhaps become my newest follower as well! Thanks!
ReplyDelete~Amanda
I love all your ideas, especially the ones wit the sticks! Thanks for linking up for Friday Favorites! I'm featuring you this week. Come by and grab my featured button if you'd like one.
ReplyDeleteThese are awesome ideas. The stick candles are most definitely my favorite!
ReplyDeleteI'd love to invite you to my Thingamajig Thursday Party...http://radcrafter.com/2011/11/radcrafters-thingamajig-thursday-party-1/
Alida
Jerri, thank you so much for the feature! I look forward to linking up every week, thanks for hosting!
ReplyDeleteAlida, thank you so much! I'll most definitely be linking up & checking out your blog!
ReplyDelete